When I first learned about passive income and online businesses, I realized it was best for me to obtain a website.
Creating a website and building a brand around something you love can be extremely powerful. There are many ways to monetize a blog, for example, through affiliate marketing, products, courses, e-books, and more.
To illustrate the power of websites: You’ve heard of “flipping homes”, right? That’s when you purchase property, perhaps renovate it so it will appreciate in value, then sell it for a profit. Now, it’s being said that online websites are the next best investment opportunity. “Flipping websites” is actually a thing now, with platforms like flippa.com making this all possible. Some people purchase websites, build it up, then sell it for a higher value. Others will build up their website to create passive income for themselves. I’ll explore more about monetization in later posts.
Having your own domain and brand gives you a lot of opportunity, and I don’t think anyone should be without one! Not only is it beneficial in terms of monetary gain, but having your own site means your own space to share your passions and inspire others with your words and products.
Now – how do you go about setting up your blog? For the complete beginner, it’s actually not as hard as you may think. In the past, I put off doing something like this for an extremely long time because I didn’t know what the hell I was doing. But as you continue reading, you’ll find it takes a mere 10-20 minutes to set up your website, and it’s not that complicated! 
Setting Up Your Blog
What is a Domain and What is Hosting?
First, it is necessary to learn what hosting and domains are. When I started out I had no clue what it all meant.
Hosting is basically the server that allows you to host your website. It lets you put content on your page.
A domain on the other hand, is your website name/URL. For example, my website – digitalnomadquest.com is a domain.
You can’t put content on your domain if you don’t have a hosting server connected.
Purchase Your Hosting Plan:
I recommend using HostGator to host your site because it is very simple, affordable, and easy to set up with WordPress (a content management system). Their customer support has been great to me, as they have fixed my site multiple times when I accidentally messed it up.
Here are some steps to purchasing your first hosting plan. Hosting with HostGator starts at ONLY $2.75/month depending on which package you choose. I typically purchase plans for about 1-3 years because of the discount you get.
To purchase your hosting plan:
1. Go to Hostgator.com (if you would like, use my link here). If they have a good promotion, take advantage of it. I actually even purchased the 3-year plan to grab a better value.
2. Click “Get Started Now”.
3. I’d purchase the “Baby Plan” because this provides hosting for unlimited domains (if you’re planning to make multiple domains). Then click “Sign Up Now!”
The Baby Plan lets you host multiple sites (as many as you want), and domains only cost around $10/year! If you think you’ll only need one single domain, go for the Hatchling Plan. But if you’re considering down the road, it’s common to want to create new websites, and it would cost a lot more to purchase another hosting plan just for that domain.
Purchasing a Domain
After you’ve purchased a hosting plan, you’ll need to think about what domain (URL) you would like for your blog.
In order to choose a good domain, I would suggest it to be the following:
- Relevant – Make sure your website name relates to the content on your site. With my blog, for example, you can kind of get an idea what the name digitalnomadquest represents.
- Easy to remember – Create a concise URL that is memorable so it’s easy for others to type in your domain name. I would say you should have a max of 3 words in your link (like “digital nomad quest”). I think even 3 is pushing it.
- “.com” – Most people type in .com when they’re looking for a website, so you should find a .com URL.
- Possibly put your keyword in your website name – There is debate on whether or not adding your keyword in your URL matters to ranking your website higher in search results. I personally put the “digital nomad” keyword phrase in my URL. There are ways to do keyword research to make sure your website is more search engine optimized (SEO), which I may talk about in a future post.
Where to Purchase Your Domain:
After you’ve done some keyword research and/or figured out what domain you would like, you can go on Namecheap to check if your domain is available. I use Namecheap and have found it affordable, simple to use, and reliable, and the customer support is great.
Instructions below:
- Go on namecheap.com (if you want, use my link here)
- Look for the domain you want.
- Namecheap will tell you if the URL is available and show other forms of the URL (for example “.net”, “.org”, “.website”, “.me”, “.ninja”)
- Add the available domain to your cart! Click the shopping cart button and check out.
Linking your Domain to Your Hosting Plan
After you’ve purchased the domain you would like, link this to your hosting plan.
To do this, you’ll need some of your account details. Once you’ve purchased your hosting plan, HostGator will e-mail you information about your account. This will include:
- The login to your billing account that you set up when you purchased your plan.
- The login to your control panel. The control panel is where you can link your domain & hosting as well as link to WordPress (the Content Management System you’ll use to blog with).
- The 1st nameserver and 2nd nameserver information. This nameserver information is your way of connecting hosting to domain.
Now, go back to Namecheap.
- When you’re on the Namecheap homepage, click on the top right settings, and click “manage domains” (make sure you’re logged into your account).
- Click into your domain
- On the left side, click “Transfer DNS to Webhost”.
- In the email you received from Hostgator, get the information of the 2 nameservers. Copy this into the two text boxes for 1st nameserver and 2nd nameserver.

Connecting WordPress
Now that you’ve connected your hosting to your domain, you’ll need to go into your Hostgator Control Panel to connect with WordPress (where you will write your blog entries). I recommend WordPress as it is easy-to-use and has tons of plugins and customization abilities. It also is a good platform for optimizing SEO.
- Go back to the e-mail and get your Control Panel login.
- Click the link in your Hostgator e-mail that directs you to the C-Panel.
- Click on “QuickInstall” under “Softwares/Services”
- Click “Install WordPress”
- On the scroll button – click the arrow and find your site. You don’t need to fill in the “install/path/here” part.
- For Admin Email, select the email you want linked to your site. Fill out “Blog Title” with the name of your blog.
- For Admin User – select a username you would like to use to login to your site
- After you’ve filled in your name, click “Install WordPress”
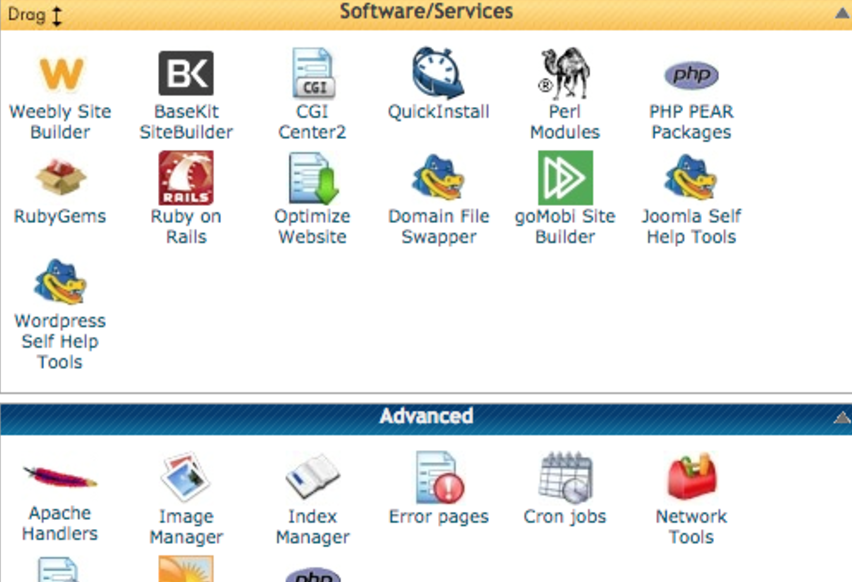
Now your site should be connected to WordPress. You will receive another e-mail with the password for your login. The link to your WordPress dashboard should be in that e-mail as well.
To easily access your website dashboard – type your URL: e.g. digitalnomadquest.com and then add “/wp-admin” at the end. If your site were ilovemakingwebsitesandstuff.com, your admin dashboard would be located at ilovemakingwebsitesandstuff.com/wp-admin. Adding this part at the end will let you access your login, in which you will put in the Admin Username you’ve selected as well as the password from the e-mail.
Conclusion
You should now be able to blog with WordPress by connecting with Hostgator and Namecheap! This post is updated as of February 2017, so let me know if I’m missing anything or if the user interface of these platforms changes. In future posts I will talk about how to make your blog successful.


Comments 4
Hi,
“There’s no use in buying a domain if you don’t have a hosting server to host it”
Just thought you might be interested to know that you can still have an email address or someone may wish to redirect a URL to another website. Alternatively some people sit on domains hoping to be able to sell them later.
dc
Author
Ah that is true. I’ll add this in the post. Thanks!
I’m having a hard time getting my website customized. It seems that, no matter what it is, anything that has to do with tech stuff, I can follow along with a YouTube video explaining exactly how to do it, step by step, but at a single point I get stuck!
I don’t even understand how blog posts work, meaning that I love to write, so content isn’t the issue, but I know that you start a few posts on a single page and then hit “read more” or “continue here” links that bring your audience to the full article. I have found nothing to explain how that’s done. I’ve had my domain and hosting for my WordPress site for 2 years and have wasted more money on tools like Elementor Pro, and creative marketplaces, where I found beautiful dynamic websites , but all for nothing because I continue to get lost.
I’ve been using Canva since before Canva was such a popular tool, so I’ve been creating my site there and hoping to redirect my site there or vice versa, but again, how the hell do I add a blog and how does it work, in terms of pages?
I have everything I need to start my business except for a good blogging website. Please help.
Thank you
Tristany
Author
Hey maybe check out this video – it should help: https://www.youtube.com/watch?v=Lacif6V6MmA&t=220s thanks!