

In this post we’re going to do a ConvertKit tutorial 2021 – everything you need to do know with email marketing for beginners. In 2020, businesses were presented with a challenge. Physical shops, facilities, and locations saw reduced customers and fell on hard times, with many of them closing down indefinitely for short periods of time. Or, for some unlucky businesses, permanently.
During the COVID-19 pandemic, email marketing has been a lifesaver for many of the surviving businesses. It has allowed companies with physical locations to take their business online, offering the buying and shipping of their products as well as keeping customers up to date with special promotions. It’s also an amazing tool for small creators and online entrepreneurs.
Many of the businesses used software for their email marketing, with MailChimp being one of the most popular software. However, I firmly believe that ConvertKit is the better option when it comes to effective email marketing.
Why? ConvertKit is simple, easy to use, and is appealing to the eye. Today, I’m going to share with you this ConvertKit tutorial that will help you navigate your way around the platform should you choose to give it a try.
Sign up for ConvertKit for FREE here.
ConvertKit Tutorial 2021: Email Marketing for Beginners
Cost of ConvertKit Plans
One of the most important pieces of information to know about ConvertKit before you sign up is how much the platform’s plans cost. This, combined with your needs, will help you determine how to get the bast bang for your buck. Check out ConvertKit’s pricing plans here.
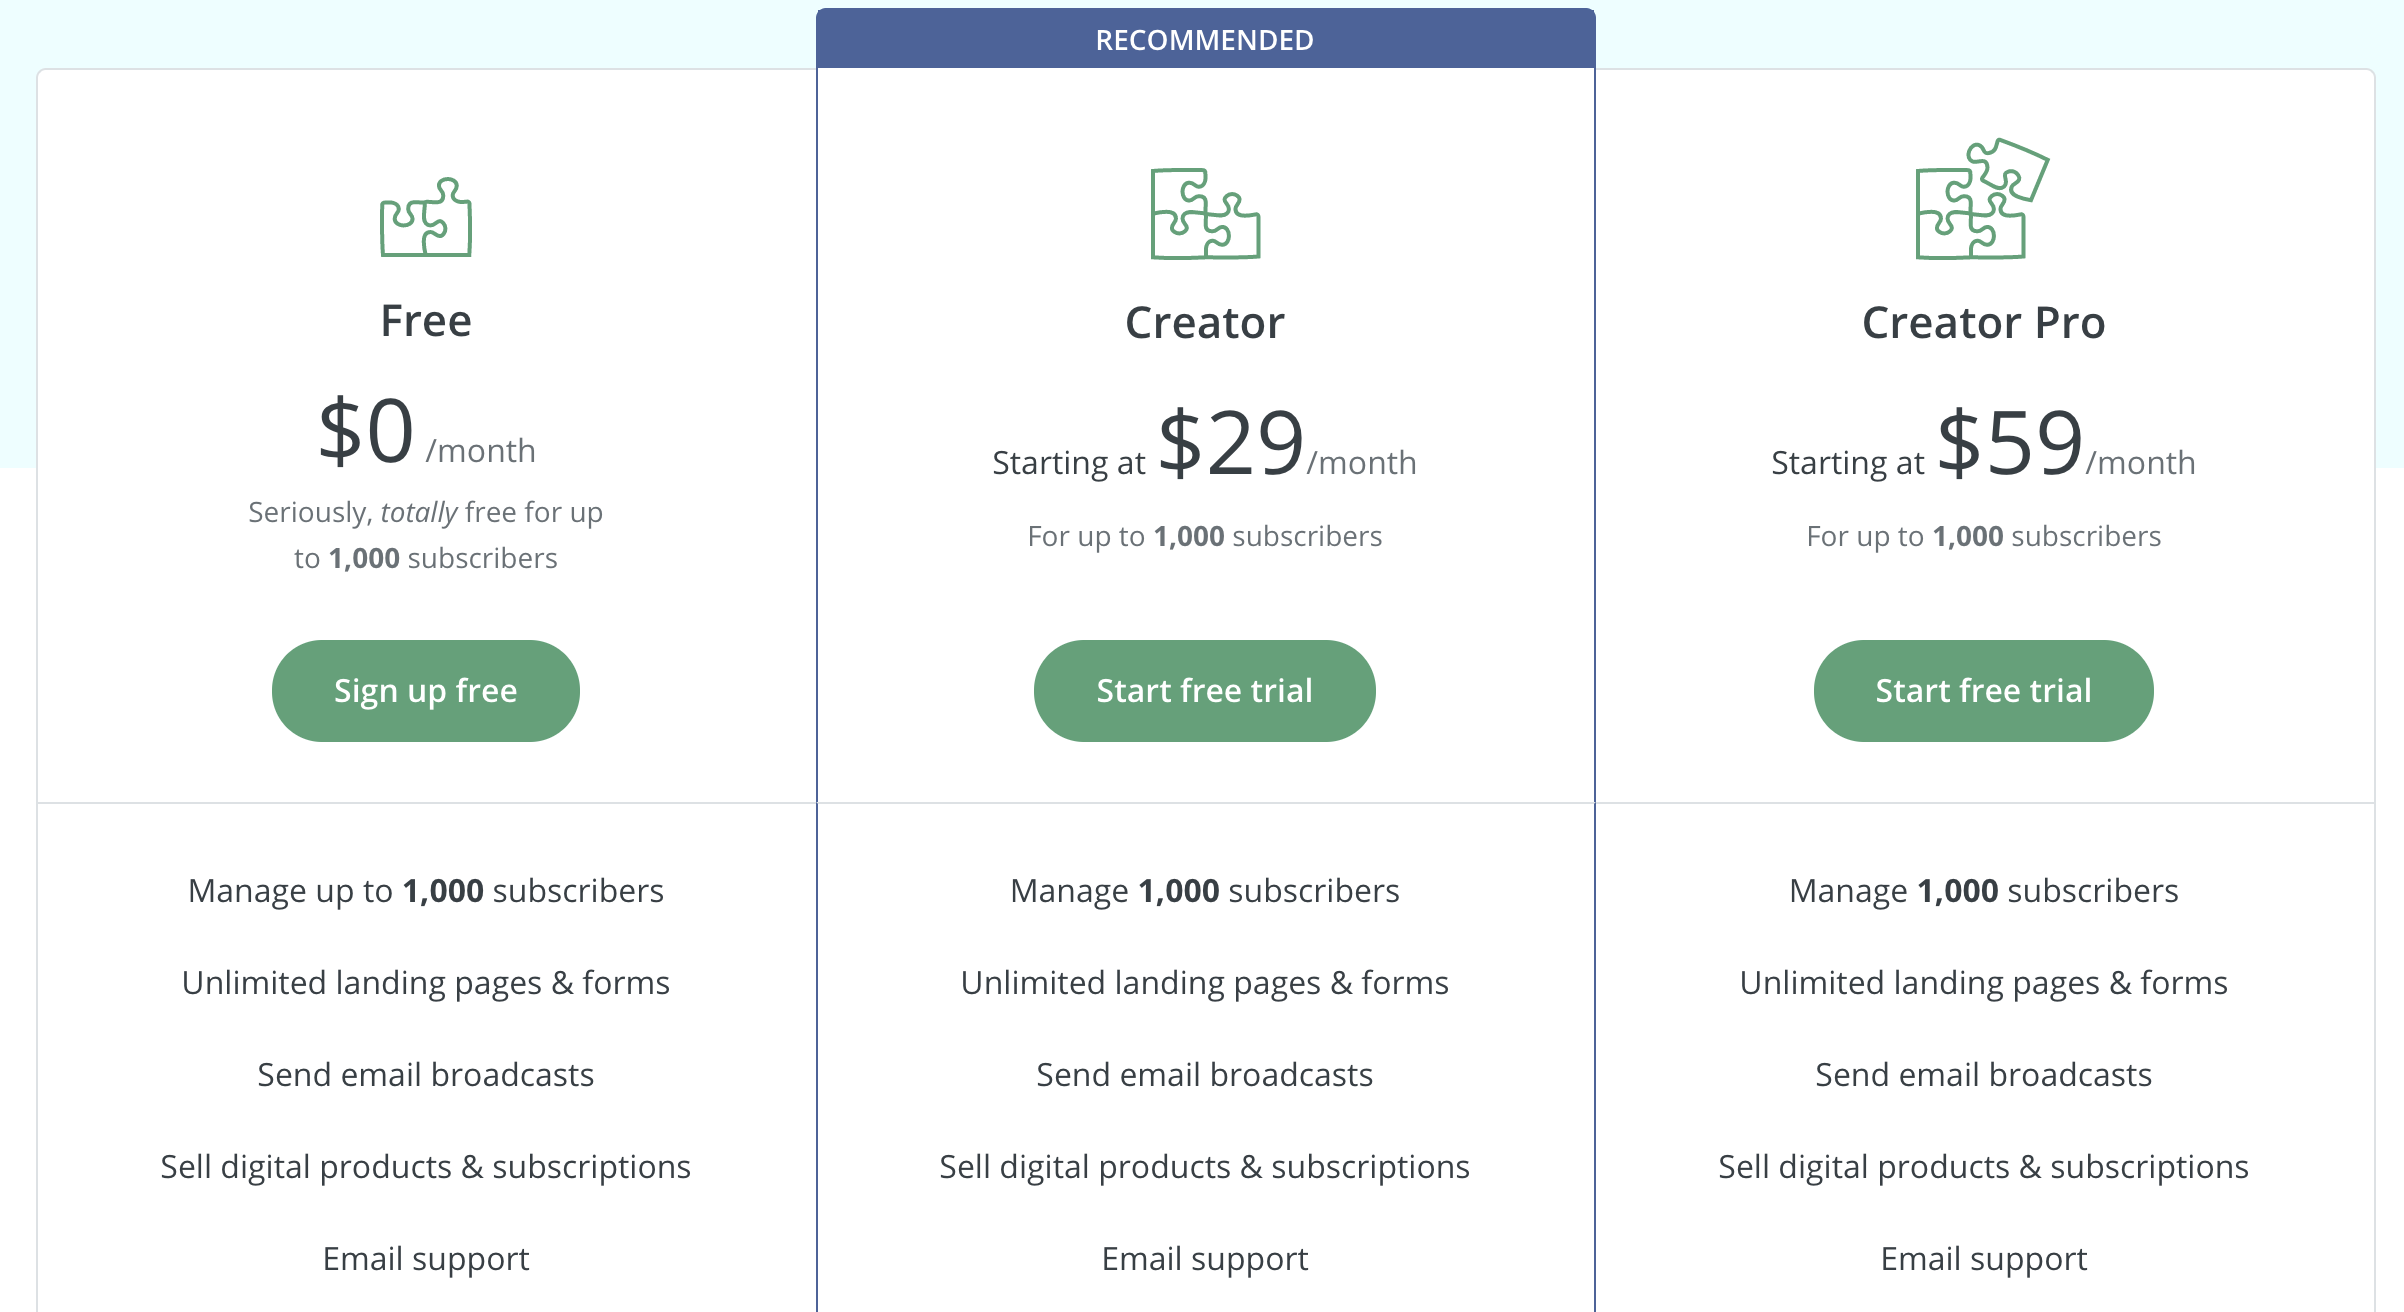
Free
ConvertKit’s free plan is ideal for small-scale creators with modest followings of up to 1,000 email subscribers. It allows you to send email broadcasts, provides you with unlimited landing pages and forms, enables you to sell products and subscriptions, offers top-tier email support and much more.
Creator
The Creator plan starts at $29 per month and caters to users with more than 1,000 subscribers. It provides you with the same features as the free plan but also includes a variety of others. These include automated funnels and sequences and free migration from another tool.
Creator Pro
For $59 per month, the Creator Pro plan is perfect for businesses or creators with large followings. It offers everything that the previous two plans do, but also offers a number of other features that are worthy of the extra expense.
Again, check out ConvertKit’s pricing here and see which plan fits you best.
PS Check the video version of this post here:
Importing Subscribers
- Export your subscriber list as a CSV.
Start by exporting your subscriber list as a CSV file. The CSV file you use should contain one column per field, with each column containing a header row that corresponds with the name of the header row you have in ConvertKit.
- Create a tag.
Create a tag in ConvertKit by clicking the ‘+ Create a Tag’ button on the sidebar if your subscribers page. Give your tag a name; don’t worry, you can edit the name at any time. Click save.
On the subscribers page, click the ‘Add Subscribers’ button and then the ‘Import CSV’ button in the window that pops up. Select the tags you want to import your subscribers to.
- Upload CSV file.
Drag and drop your CSV file into the pop-up box or upload the file from your computer.
- Map the columns.
Select which columns contains email addresses and which contains names.

- Import.
Click the ‘Import Subscribers’ button and that’s it!
Sending Broadcast Emails
- Start the broadcast.
In ConvertKit’s main navigation, select ‘Broadcast’.
- Specify details.
Specify which subscribers will receive the broadcast. You can send it to all your subscribers or only a select handful. For example, you might send a weekly newsletter to all subscribers and a reminder about an upcoming webinar to only a few.
To send your broadcast to all subscribers select ‘Matching’ and then ‘All’. Then click the ‘Add Filter’ button and select ‘All Subscribers’.
To send it to a group of subscribers, select ‘Matching’ and then ‘Any’. In the settings of your filter, select the ‘Subscribed To’ button and then ‘Tags’; use the dropdown menu to select the appropriate tags.
- Select which subscribers should not receive your broadcast.
To exclude a group of subscribers, create a second filter by clicking the ‘Add Filter Group’ button.
Then, select ‘Matching’ and ‘None’, and then set the settings to ‘Subscribed To’ and ‘Tag’s; choose the tags you want to exclude.
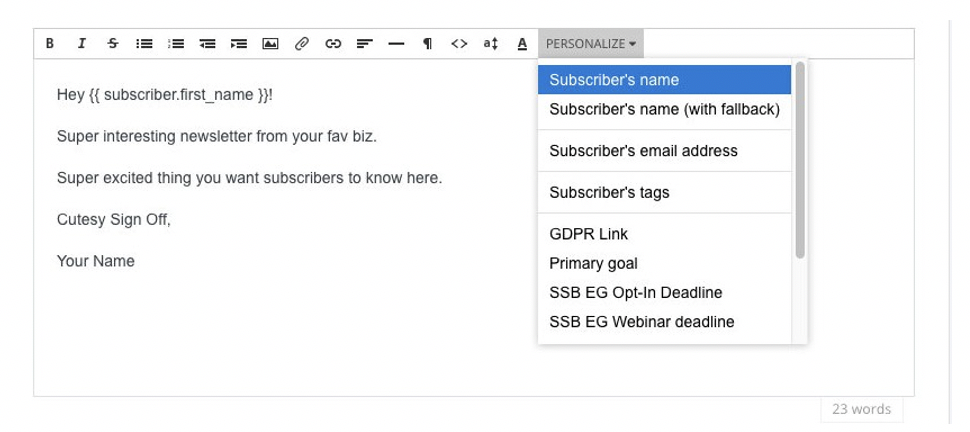
- Draft email.
Navigate to the ‘Content’ tab of your dashboard. To include your subscriber’s first name in your greeting line, position your cursor where you want their name to go and select the ‘Personalize’ button. Select ‘Subscriber’s Name’.
- Schedule and send your broadcast.
When you’re happy with how your broadcast looks, select ‘Save’ to save your draft and then select ‘Next Step’. Select when you want the broadcast to send and then hit the ‘Send’ button.
Creating Landing Pages and Forms
Landing pages
- Select a template.
Select a landing page template that matches your content and site. Each template offers a free preview, so feel free to try one or two or all of them to see which you like best.
- Create a headline.
Write a catchy headline that summarizes what you want to tell your audience upon their first glance at your site. You can change this headline at a later date if you want to.
- Add your image.
Select an image that you want to use on your landing page. You can upload your own image or use a free image that comes with ConvertKit’s integration with Unsplash. You could also use an image from Instagram or select a background from Hero Patterns.
- Add your content.
Now you can add your landing page content. Keep the blurb straightforward and simple but shy away from showcasing your unique personality.
- Share
Save and share your work by clicking the ‘Save’ button and then viewing a preview of it. You can use your original share link to view your page in a mobile browser. You can also send your link to friends and post it on social media for your friends and followers to check out your new page and give you feedback.
Forms
- Start the form.
In your Broadcasts page, select ‘+ Create Form’ and then ‘Form’ in the next box.
- Choose form format.
Choose the format of your form. You are given three options: inline, modal, and slide-in.
- Choose a template.
Regardless of which format you choose; you will be presented with a number of templates. Select the one that you like the most.
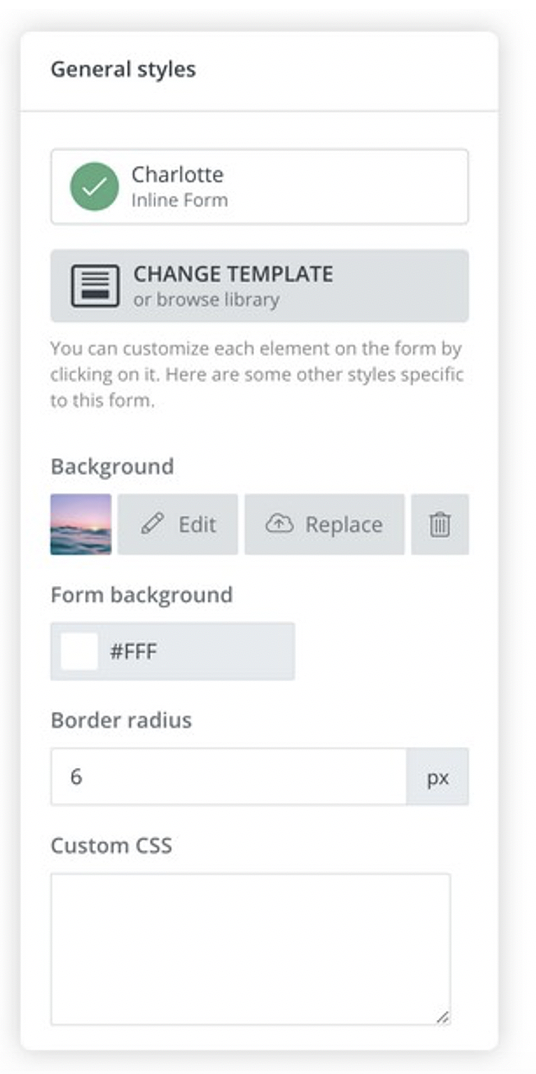
- Customize your form.
Use the ‘Styles’ sidebar on the side of the page to further edit and customize your form.
- Organize your form.
Use the Form Editor to edit, rearrange, and re-label your form. You can add a new field by selecting the ‘+’ beneath the final field of your form.
To rearrange your fields, hover over each one until you see the grip icon (3 parallel lines); grab the grip and drag your field up or down.
- Embed the form.
The ‘Embed’ section of your form will give you the code you need to add your form to your website. You can choose from a one-line JavaScript, a full HTML embed, a direct link, a URL, or a WordPress short code.
If your website runs on WordPress, you could also choose to use the WordPress Plugin to embed your Form.
Customizing Your Domain
- Add your sub domain.

Within your account settings, navigate to the Custom Domains page and click ‘Add a Domain’. In the top field of the box that pops up, enter your sub domain without the www. prefix. Underneath of that field select the landing page you want your subscribers to land on if they visit the subdomain directly.
- Save.
Click ‘Save’ when you’re happy with your subdomain.
- Add your DNS records.
Next, add the DNS records provided to you by your host provider. They will provide you with 3 DNS values in the ‘Value’ column.
- Refresh.
Finally, refresh your page to view your changes. Sometimes, it can take up to 24 hours for changes to be visible on your page so be patient.
Getting the ConvertKit Plugin for WordPress
- Download and install the plugin.
First, download the plugin. Next, upload it to your WordPress admin panel. If the plugin comes in a .zip format, you can install it by uploading the file to the indicated space on your screen.
Once it has been uploaded, press the ‘activate plugin’ link.
- Add your API key.
Sign into your ConvertKit account and copy your API Key using the copy and paste function of your cursor. You can do this on the Account page.
On your WordPress dashboard go to ‘Settings’ and then ‘ConvertKit’ and paste your copied API key. Click ‘Save’ to save your changes.
- Set a default form.
In the plugin settings, you’re able to choose one of the forms that you’ve already made and set it as your default form. This ensures that the form is shown on the bottom of each of your posts unless it has been otherwise specified that it should not.
Leave this selection at ‘None’ if you’d prefer to manually select a form for each individual post.
- Add default forms for a category.
If you try to edit a post category, you’ll see a box that enables you to set the ConvertKit Form for every post within the category. The form chosen in this space will override the default form that you chose in your settings.
If a given post has multiple categories and each individual category has a form assigned, the form chosen for the newest category will be selected. Only one form can be shown at a time.
- Adding forms to individual posts.
If you edit a post published on your blog, you’ll find that a new box has been added below the content editor. This is for the ConvertKit plugin. If a form is chosen here, it will override category forms and default settings found on the plugin settings page.
You can choose any form here, or switch things up and choose ‘None’ so that your post doesn’t have a form.
- Adding the ConvertKit form widget.
You could also opt to add a ConvertKit form widget to your sidebar, after a blog entry, or anywhere else that it makes sense to do so. All you have to do is drag and drop.
Creating Automations and Email Sequences

- Start a new automation.
Navigate to your Automations page and find the red button titled ‘New Automation’. From there, click ‘Create Automation.’
- Tag and select subscribers.
On the drop-down menu of the pop-up box, select the form that your subscribers would have to be added to in order to receive your intended automation. Click the ‘+’ and ensure that your subscribers are tagged with a tag that matches your automation. Click ‘Add Action’ to finalize the selection.
- Attach an email sequence.
Click the next ‘+’ button to make an email sequence. Decide on a name for your sequence and type it into the ‘Sequence Name’ box; click ‘Create Sequence’.
- Draft an email.
Start writing a draft email. Remember, now that you’ve created your sequence, this email will be the first one sent to new subscribers.
Using the ‘When to send’ box you can decide how soon after your subscriber receives their previous email that they will receive another one. You can also select which days you want emails to be sent on, excluding days as you see fit.
From here, you can use the side bar to continue adding emails to your sequence and choosing the time intervals between each one.
Conclusion
We hope you enjoyed this ConvertKit tutorial 2021. ConvertKit is definitely our favorite option for email marketing. If you’re looking for something that is reliable and easy-to-use, we’d highly recommend trying out ConvertKit. On Digital Nomad Quest, we actually switched from Mailchimp to ConvertKit because it had everything we needed with automations, email sequences, clean broadcast emails, and more. If you’re looking for the most robust email marketing solution that you can use from now until the future as you scale up, I’d highly recommend checking out ConvertKit.
Check out ConvertKit for free here.
